BYO Modem Router Configuration Guide
Have your nbn™ connected? What is next? You should set up your nbn™-compatible modem/router before enjoying the fast internet plan.
If you don’t want to bother with router configuration, but enjoy the internet straight away, you can purchase a pre-configured modem router from us. To select the right router, read this article for more information: https://occom.com.au/staging64/how-to-select-nbn-modem-router/
Alternatively, you may configure the router by yourself. Occom is a high speed internet provider that supports BYO (bring your own) modem router for all nbn™ plans. Don't worry, you don't need to be a "Techie" to have your router configured. This guide helps you set up your nbn™-compatible modem router step by step.
Before we get started, you should make sure your router is VDSL compatible (for FTTN or FTTB connections) or is WAN enabled (for FTTP, HFC or FTTC connections).
Important BYO Router Settings: PPPoE Username and Password
OCCOM provides a unique pair of PPPoE username and password to each client, so your modem/router can connect to the activated internet service. Get your PPPoE username and password ready (You can find them in the activation email). We are going to use them later in the router setting.
Can I bring a router from another ISP?
In most cases, yes. Your existing router, whether you newly bought one yourself or is provided by your previous ISP, can be re-configured with new settings and connected to the internet.
However, some ISPs may lock the modem router to limit it to their service only. If you are not sure whether your router is locked, feel free to chat with our customer service team at LiveChat.
Know your nbn™ connection type
Which router you should choose depends on the nbn™ connection type. If you are not sure about the connection type at your address, you can contact us.
Different types of connections are listed below:
- Fibre to the Curb (FTTC)
- Fibre to the Node (FTTN)
- Fibre to the Building (FTTB)
- Fibre to the Premises (FTTP)
- Hybrid Fibre Coaxial (HFC)
FTTN and FTTB
FTTN and FTTB use the existing phone port for establishing a connection. For this type of internet connection, you need a modem router that is VDSL2 compatible. You can search the internet plan or ask our customer support team to see whether your modem router is VDSL2 compatible or not. Even though both ADSL and VDSL2 use the same port and share the same channel for connection, they are DIFFERENT! So, your old ADSL modem router may not be compatible.
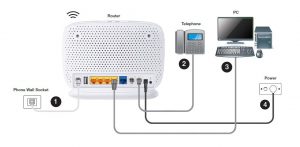
VDSL modem router connection guide
- Connect the DSL port on the back of the modem to your telephone wall socket
- Connect your computer to any of the 4 LAN ports on the back of your modem
- Connect the Power port on the back of your modem to your power socket

Login WIFI configuration page
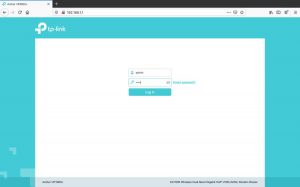
Open the Internet browser (e.g. Google Chrome, Safari, etc.) and type http://192.168.1.1/ in the address bar to visit router's configuration page. The default username and password for this router is admin/admin (all Lowercase). If your default username and password have been changed or you cannot remember, then you can completely reset your router by poking on the small hole/button written as “reset” and holding it for 10-15 seconds and then use the default username and password same as above.

Once you log in, on the sidebar, click Advanced

Click Network

Click DSL in Network and click Delete All button

Click Add after you delete all

Change connection Internet Connection Type to PPPoE

Choose VDSL and then input the PPPoE username and password provided by us, then click “Save”. You can find the username and password in the Service Activation Notice Email. (Please save others as default.) or if you cannot find it in the email you can contact our customer service team.
FTTC/FTTP and HFC
FTTC/FTTP and HFC use similar types of connection. Though coming through different channels, all of them come with an nbn™ connection box, which serves as an access point to your router. You should connect your connection box to the router using the WAN port.
WAN router connection guide.

- Connect the Power port on the back of your modem to your power socket
- Connect the UNI-D1 on the back of the NBN Connection Box to the blue WAN port on the back of the modem router
- Connect your computer to any of the 4 LAN ports on the back of your modem router
Login WIFI configuration page (Netgear)
Open the Internet browser (e.g. Google Chrome, Safari, etc.) and input http://192.168.1.1/ in the address bar to visit the router's configuration page.
Login with username “admin” and password “password”. This is the default username and password for Netgear routers. If your default username and password have been changed and you cannot remember, then you can completely reset your router by poking on the small hole written as “reset” and holding for 10-15 seconds and then use the default username and password same as above.

Once you login, on the sidebar, click Advanced

Then choose Setup - Internet Setup

Choose Yes in Does Your Internet Connection Require A Login?

Change Internet Service Provider to PPPoE

Type the PPPoE username and password provided by us, then click “Apply”. You can find these usernames and password in the Service Activation Notice Email. (Ensure the Connection Mode is Always on and please save others as default.)

Your router will reboot after you click 'Apply'. Please click 'Test' when the router reboot is completed.

The last step, open http://192.168.1.1/BRS_netgear_success.html, and wait for more than 15 seconds. After the middle light of your router becomes solid green, you can access the Internet now!
For more configuration guide, you can contact our Customer Support Team – 1300 299 999
OCCOM—Optical Communication Expert
Occom is an Internet service provider dedicated to delivering faster fibre and mobile services and faster support. Occom has been praised by tens of thousands of satisfied residents and businesses, and our products have attained commendation from industry experts. As one of the fastest growing telcos endorsed by top global and Australian financial media, Occom has set the bar for exceeding Aussies’ expectations towards customer service. Occom’s young, passionate and professional team will keep on pushing the boundary for what is possible in the future.
Tel:1300 200 999
